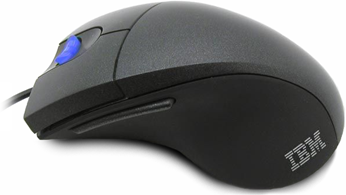
IBM ScrollPoint Pro Restoration (Guide)
After awhile the ScrollPoint pro can get some wear and a few problems can arise with the circuitry as well. This article will address that and how to refurbish the mouse to a much healthier state.
Since these mice are not so common anymore (not many were purchased) and now being discontinued by IBM and Lenovo makes them even less so; a restoration guide is a good way to keep them functional.
This guide is for the optical variant of the ScrollPoint Pro, but many of the steps should also be similar for the mechanical counterparts.
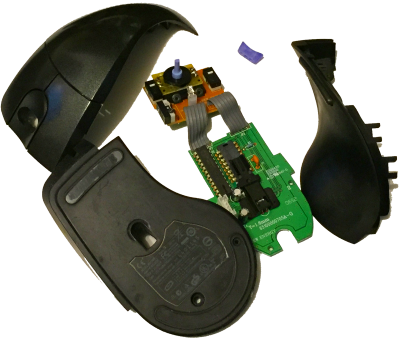
Disassembly
#1 The very first thing that must be removed is the ScrollPoint cap. Remove this with a flat-blade screwdriver tip.
#2 There are two screws at the bottom. The 5mm screw holds the top part of the mouse assembly down to the base (like in any other IBM mouse). The smaller 3mm screw underneath the teflon pad holds the side piece with the thumb button down. Since we're doing a complete dissassembly both screws can be removed.
#3 Unscrew the two screws holding in the ScrollPoint assembly, gently remove both PCBs out of the mouse.
WARNING: The two strips of wire holding the PCBs together can easily tear at the solder joints. If this happens the best scenario is probably to solder in more durable wires.
#4 You may deattach the USB cable from the PCB to allow working on the PCB easier.
#5 Remove the optical magnifier piece.
#6 Remove the fifth screw at the top left corner of the mouse (it's normally hidden underneath the ScrollPoint circuit board). Note that this screw is the shortest 3mm screw out of all of them. The side piece can now be deattached.
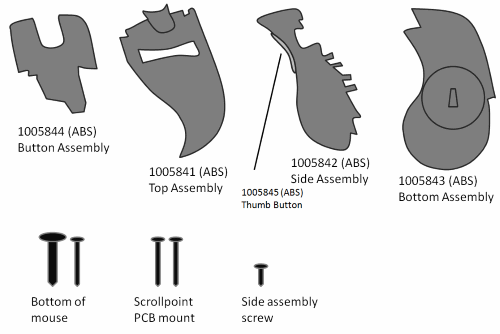
#7 (optional) If you wish to remove the top button assembly for cleaning-- simply push the button assembly out and up. Don't try pushing the tabs back, this method will not remove it and you can potentially break the tabs.
WARNING: Removing the button assembly is a lot easier than getting it back in. The buttons have a hollow square that attaches onto a protruding piece of plastic. Angling it back into place can be difficult if you're not aware of this.
Restoration
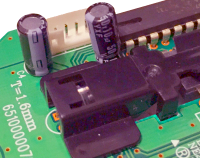
#1 The first thing we'll want to address are the low-quality capacitors on the circuit board. There will be two 10uF 25v polarized electrolytic capacitors. Replace them with an equivalent brand from a reputable company. I went with Rubycon's YXF series-- and used 50v instead of 25v-- as 50v capacitors are more common and durable.
NOTE: A lot of issues can arise as time goes on with the low quality capacitors, especially if the mouse has been in service for years.
#2 (optional) Since the ScrollPoint piece isn't exactly 'blue', the blue LED sort of misrepresents the colour of it. This is purely for personal taste, but I prefer soldering in a purple LED: this also makes the LED a deeper colour and not as visually distracting.
WARNING: After you solder in the LED, DO NOT bend it while it has been soldered in. Doing so you can rip the pads. Bend the leads PRIOR to soldering it in.
#3 Get a magic eraser and gently remove all of the wearning-down sticky rubber-- probably a good idea to wash the plastic afterwards as well. If you wish to restore the IBM logo, I would recommend ordering some from stickeryou. Basically get an IBM logo printed out in the same dimesions on some clear film and place it back in a similar position.
#4 If you look at the mouse assembly where the plastic pieces protruding hit the microswitches, they'll be worn down a bit. Get some tough glue (like gorilla glue) and fill in these crevices.
After all of that is complete and the mouse is cleaned, you can reassemble it.